Howdy, folks. As Jeremy has mentioned, this past Friday, April 4th, we hosted a webinar to demonstrate Isograph's FaultTree+ tool. One of the topics we discussed was how you can use the Fault Tree and Event Tree features of the tool to perform a quantitative Layer Of Protection Analysis (LOPA). This post will serve as a little summary of that meeting, for anyone who was unable to attend.
The first stage of a LOPA might be done externally to a quantitative tool like Fault Tree. The first thing you'd want to do is identify hazards, determine an acceptable risk level for those hazards, and ask what you're doing to mitigate them. This might have more in common with a Hazop study. Once you've identified your hazards and protection layers against those hazards, the next thing you might want to do is quantify it. How often will the hazard occur? How effectively will our layers of protection mitigate the risk of the hazards? Can we objectively rank these risks? This sounds like a job for Fault Tree and Event Tree analysis.
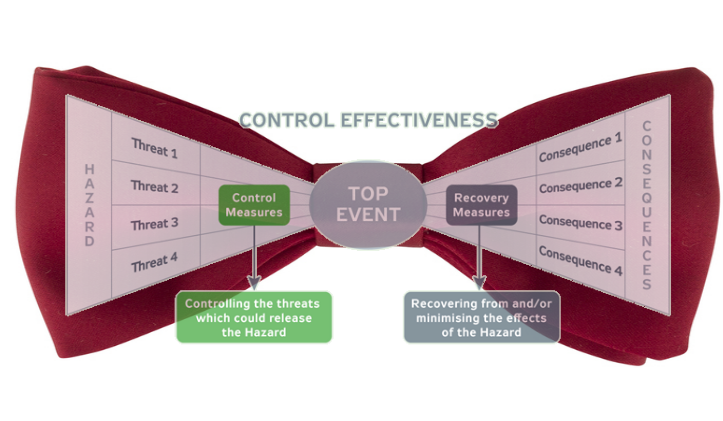
A Fault Tree can very easily be used to quantify a hazard. In fact, that's the primary usage of the method. By coupling it with an Event Tree, we can find out how well that hazard is mitigated by protection systems. If you're not familiar with it, Event Tree analysis is related to Fault Tree analysis. It uses a similar quantitative calculation. The difference is that, while Fault Trees examine the failure leading to a hazard, Event Trees examine the consequences following the hazard. Sometimes, when coupled together, they're called "bowtie events".
On Friday April 4th at 9am PST to learn more about applications of our FaultTree+ software. During this demonstration we will introduce our fault tree analysis software FaultTree+ and as an added bonus we will be discussing how to tie a fault tree to an event tree and perform a LOPA study. Layer of Protection Analysis, or LOPA, is a study developed to identify risk. By performing a LOPA on a system you can create a method for identify the actions available to mitigate the potential consequences of a particular risk. To do this we will start with likelihood of a particular hazard occurring, analyze the system using quantitative methods, and identify the mitigation measures against the hazards that have been identified.
Once the mitigating actions have been identified the probability of those hazards occurring can be reduced by implementing safeguards that bring the hazard into an acceptable level. An event tree is an excellent way to determine the consequences of successful, or the failure of, safeguards.
Basically, a LOPA is performed to identify the weakest points of a system and evaluate the safeguards in place to mitigate the consequences of that hazard.
The EcoCar sounds very green but what is it? The EcoCar program is a 3 year student engineering program sponsored by the Department of Energy, General Motor and of course Isograph (among a few others). The competition includes 15 North American Universities. Students take a Chevy Malibu and compete to improve environmental impacts without sacrificing safety, reliability, performance or accessibility to consumers.
Although the concept of giving a bunch of college kids a Malibu to take apart and rebuild seems bit risky. The project has been a very beneficial endeavor for both the students and the sponsors. Most of Isograph's support went to the University of Ohio. http://ecocar2.osu.edu/ , according to their website, they decided to use a Parallel-Series Plug-in Hybrid Electric Vehicle (PHEV) architecture. The architecture includes an E85 engine, two Parker-Hannifin electric machines, an A123 battery pack, an automated manual transmission and a charging system. Which allows the Malibu to drive 50 miles before the gas engine turns on! Pretty amazing considering these kids would meet once a week and work on the car one day during the weekends.
For several years Isograph has supported students on the EcoCar. and EcoCar 2 programs. EcoCar3 is taking applications so the competition should be back on shortly. The competition can be followed on the DOE website: http://www.ecocar2.org/
Today I would like to address one of the most commonly asked questions by new users of our FaultTree+ software, which is: Copy and Paste vs. Copy and Paste Special. When used correctly Copy and Paste and Copy and Paste Special can be a huge time saver. If used incorrectly this feature can unintentionally be introducing Common Cause Failures (CCF) which can kill the reliability of a system or create copies of existing events or gates, which were intended to be CCF, making your tree more reliable than it should be.
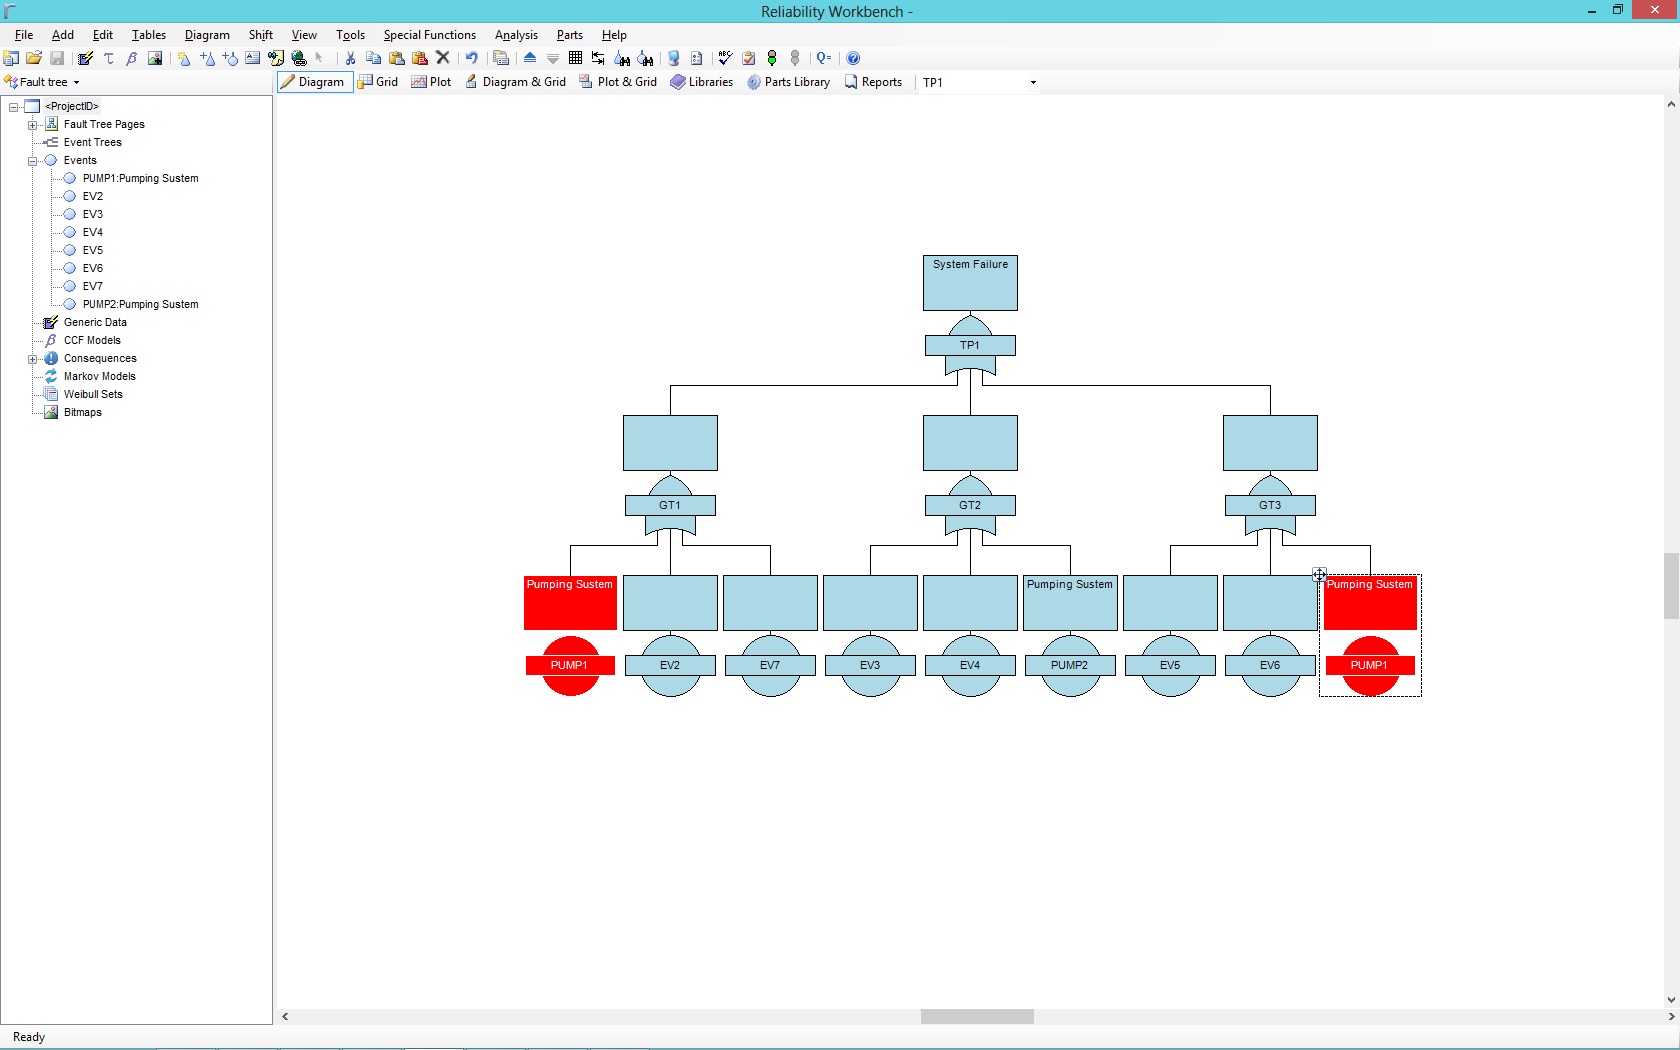
Copying and Pasting a gate or event will cause the same gate or event to appear in different parts of the tree. Pump1 will be our example, if we Copy and Paste Pump1 from gate GT1 and paste that pump under gate GT3. Pump1 would now be listed under 2 separate OR Gates.
As you can see in the example below the event named Pump1 has been Copied and Pasted under gate GT3. The event Pump1 has the exact same name in both events making Pump1 a CCF. Using Copy and Paste is representing the same event in two different branches of this fault tree.
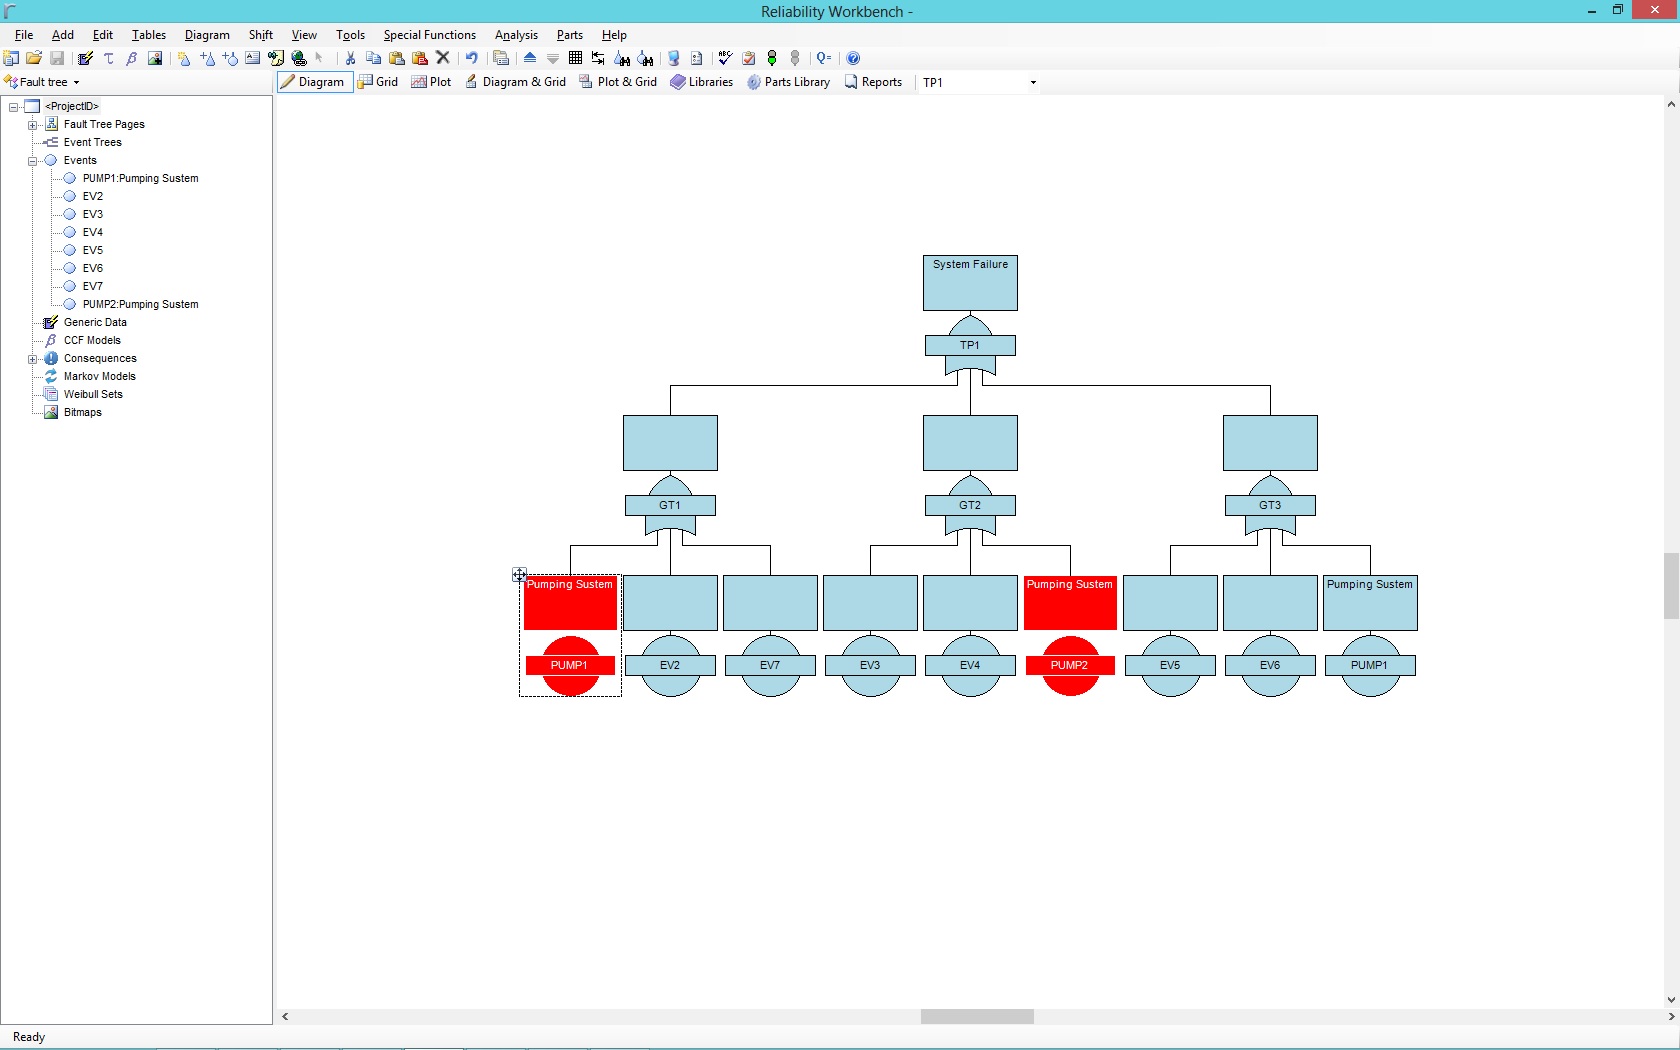
Copy and Paste Special on the other hand creates a copy of Pump1. This is not the same event but an identical event. As you will see below I have used Copy and Paste Special to add a copy of Pump1 under gate GT1 to gate GT2, the new identical pump is named Pump2 not to be confused with the event Pump1 under gate GT1 and GT3 . Pump2 is an identical in every way to Pump1 but is not the same pump. In this case Pump2 would not create a CCF. Please note that when using Paste Special the software has automatically renamed event Pump1 to Pump2. The new gate or event can use any naming convention you would like as long as it is not the same name as an existing event. When 2 gates or events have the exact same name the software recognizes those gates or events as the same gate or event.
Howdy, folks. This will be the first installment of what we hope will become a regular feature around here. Each Tuesday, look for an article highlighting a technical aspect of our software. This may be a demonstration of a feature, an explanation of the mathematics that power the tools, or some comments on technical support questions that we're frequently asked.
Today, I'll be talking about the Grid Control feature of our Availability Workbench and Reliability Workbench tools. If you've used our AvSim or FaultTree+ software, you know the power of the tool, and the usefulness of the diagram view to be able to create and edit intricate Fault Tree or Reliability Block Diagrams (RBDs). However, sometimes you may find that you have to do some task, such as text entry, or finding and replacing some information, that can be cumbersome to perform in the diagram view.
For instance, suppose you've created a large, multi-page Fault Tree, and now you want to add unique IDs and descriptions to all the gates and events, so you can identify what each one represents. To do this in the diagram view, you'd need to locate each item individually, double-click to open the Properties dialog for the gate or event, set the ID and description, click "OK" to close the dialog, find the next item, rinse, and repeat. There's a lot of back-and-forth between mouse and keyboard, and hunting through the diagram for the items you want.
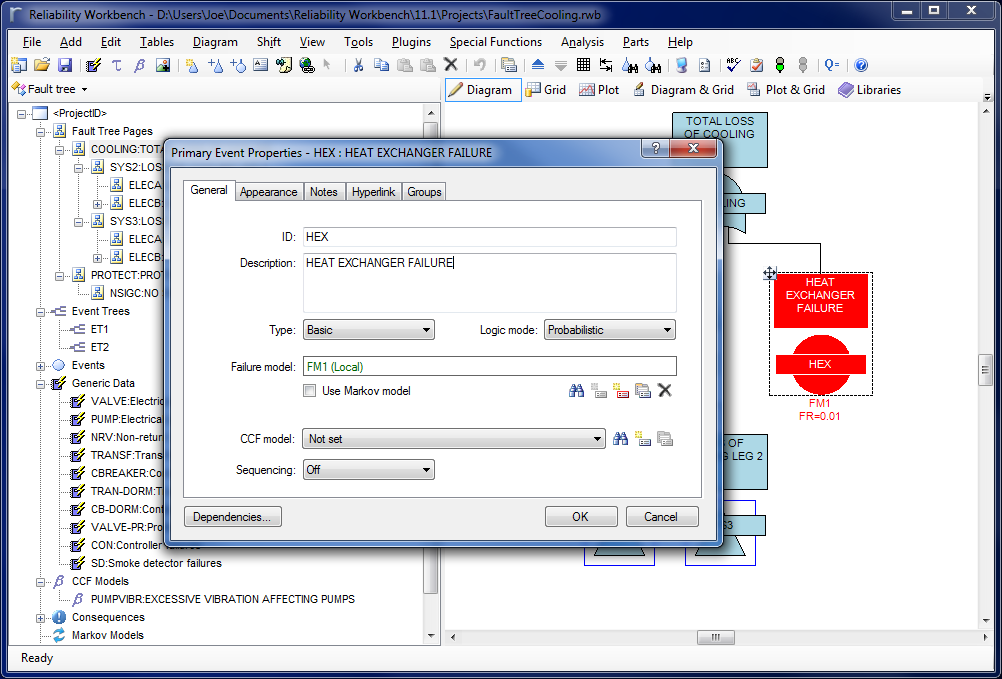
The Event Properties dialog from FaultTree+
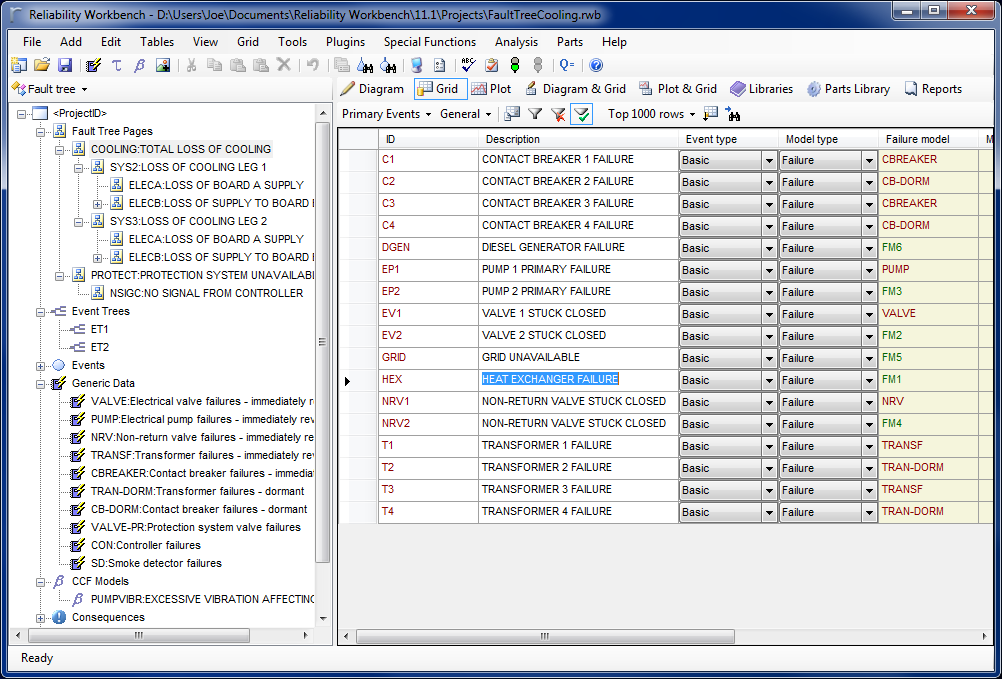
The Grid control helps with this by providing a tabular format for editing data, similar to what you'd see in Microsoft's Excel or Access products. Each gate or event appears on one line of the grid, and you can use the cursor keys, or the tab key, to navigate the records and fields. To edit some text, simply highlight a field with the mouse or keyboard and start typing, or press Enter on your keyboard.
The Grid view in FaultTree+
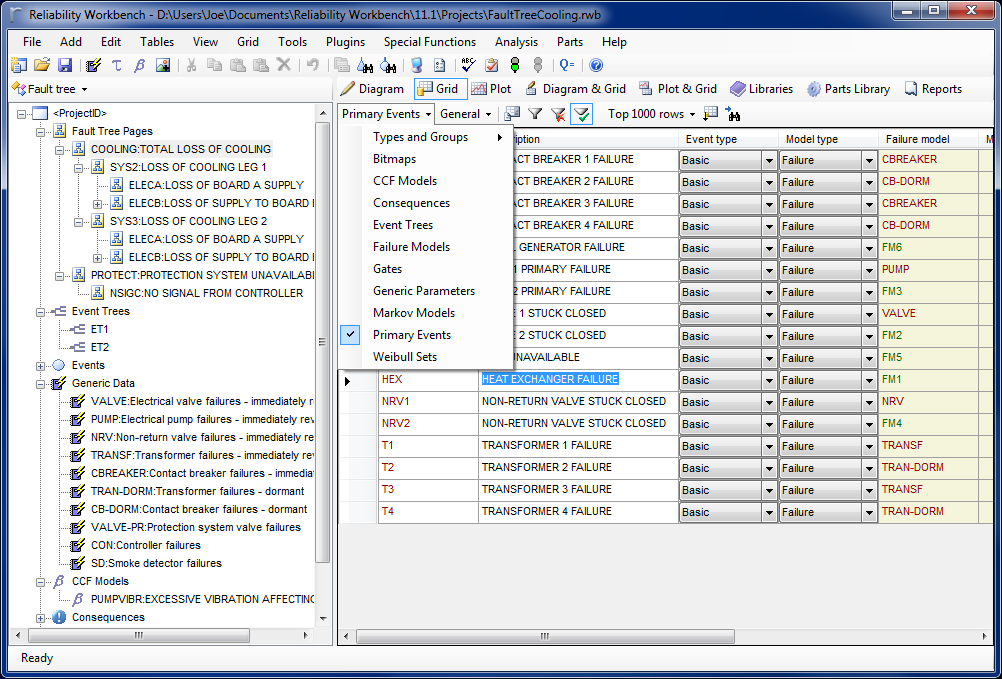
From the grid view, you can use the table selector to choose which data you want to display. This might be the Gates, Events, or Failure Models table in FaultTree+ , or the RBD Blocks or Failure Models table in AvSim.
Grid Table selector
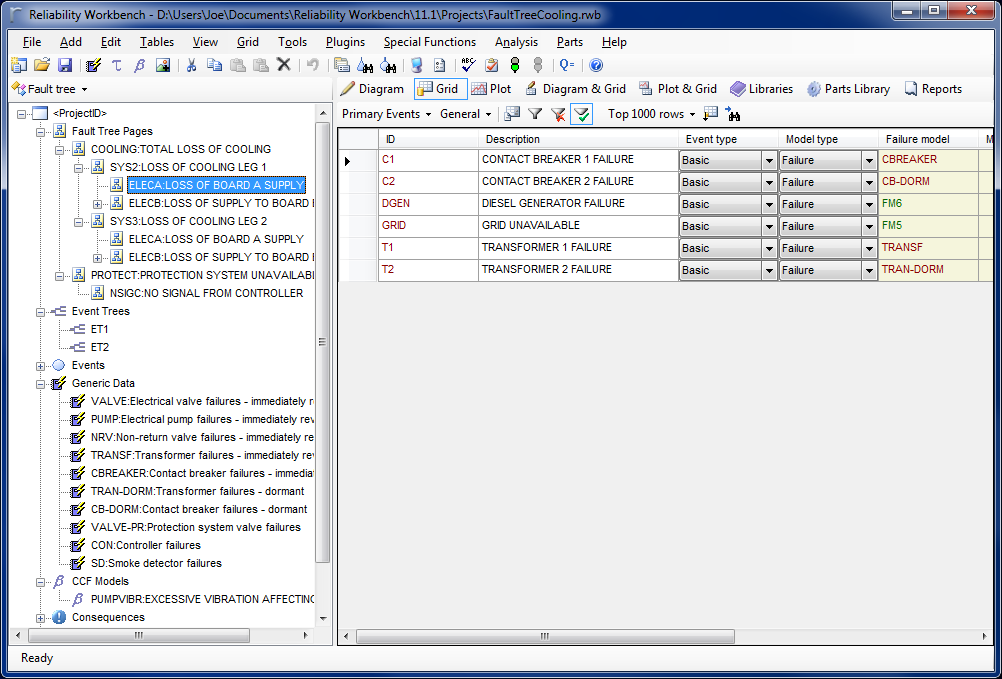
With a given table selected, you can refine which records should be displayed by using the "Filter Grid by Tree Control Selection" option, found in the Grid menu. This mouthful-of-a-name simply means that data will only be displayed in the Grid if it's relevant to the selection in the tree control on the left hand side. For instance, selecting a particular gate in the Fault Tree hierarchy will only show events under that gate, or selecting a Failure Model group in the AvSim project will only display failure models in that group.
"Filter by Tree Selection" turned on; note how only events logically dependent on the selection on the left are displayed in the grid.
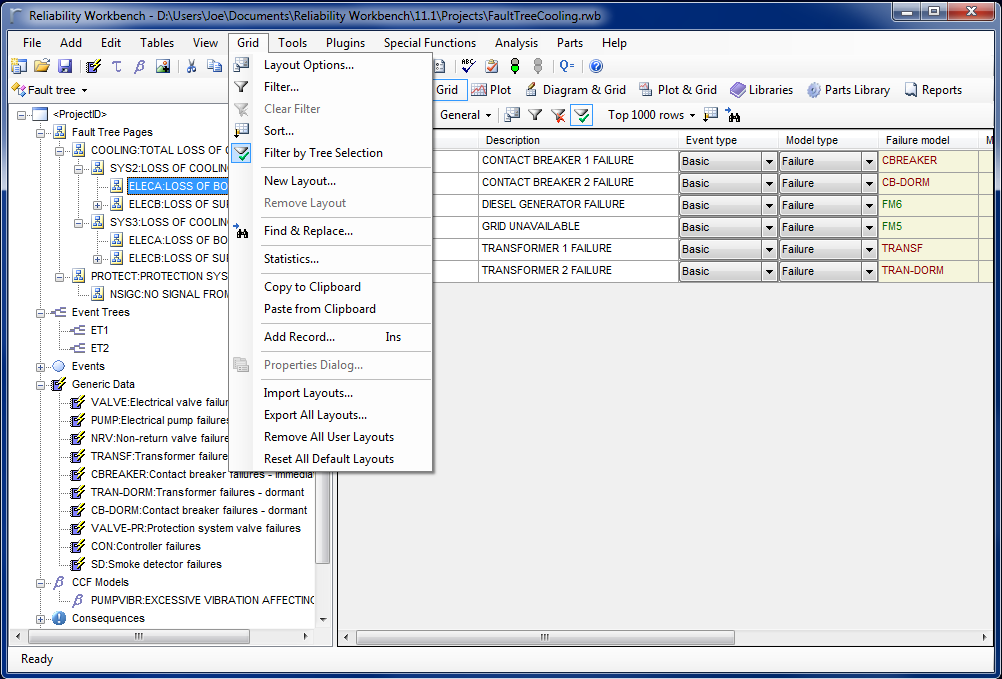
There are plenty more options in the Grid view that allow you to choose what data is displayed. You can use the Grid Layout options to choose what columns should be displayed, and what their order should be; the Grid Filter provides further methods of filtering records; and the Grid Sort allows you to choose how the records are sorted. And any custom grid layout, filtering, or sorting you've created can be saved, so you can share it with your colleagues or transfer it to a new computer. You can even copy and paste data directly from the Grid view to a spreadsheet application like Microsoft Excel.
The options under the Grid menu. Layout Options, Filter, and Sort are all near the top. Options to import and export grid layouts are near the bottom.
There's even a Find & Replace feature, for when you need it. The cool part is, when you use Find & Replace, it will only apply to the currently-displayed records. If you use a filter to hide certain rows, they won't be included in the replacement.
The Find & Replace dialog. This works exactly like you'd expect.
And for those times when you want the Properties dialog, you can just double-click the grey space to the left of a grid row to open the Properties dialog for the item.
Why don't you take a look at the Grid control, and try it out? I've found it to be a great tool to use when quickly building or editing a project.
Let's Keep In Touch!
Subscribe to our newsletter to get the latest information on Isograph software.
By submitting this form, you are consenting to receive marketing emails from: . You can revoke your consent to receive emails at any time by using the SafeUnsubscribe® link, found at the bottom of every email. Emails are serviced by Constant Contact